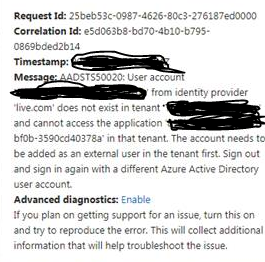
Menu Close

Blog

Slide 1

Microsoft Business Applications Blogposts, YouTube Videos and Podcasts

Helping Businesses with Technology

Slide 2

Microsoft Business Applications Blogposts, YouTube Videos and Podcasts

Helping Businesses with Technology

Slide 3

Microsoft Business Applications Blogposts, YouTube Videos and Podcasts

Helping Businesses with Technology

previous arrow
next arrow

MICROSOFT DYNAMICS 365 PORTAL USERS COUNT

Hi Everyone,

Microsoft Portal are used to give special access to KB Articles or self service etc..

But inside the organization, client want to know how many users are actually accessing portal.

In Order to get that information then

Just go to advance find > select the contact entity and view active user

select the field “username” contains data..

You will get the count of the users..

I hope this helps.

Share this:

PRODUCT DEFAULT CURRENCY IN DYNAMICS 365

Hi Everyone

As  part of my preparation for the MB2-717  Microsoft Dynamics 365 for sales certification.

Today i am going to explain how the default currency works in Dynamics 365.

In Dynamics 365 there is system currency and custom currency:

Product Currency Configuration
– Ability to add new currencies
  -System
  -Custom

– Set a default currency
  – Not required but extremely important
  – Able to set a specific currency for your customer

– Precision number can be set

– Exchange rates must be manually managed
   – Exchange rates don;t automatically update for reporting purposes
   – Base currency amounts and exchange rate on existing records remains
      the same, only new records are affected by the new rate

Let’s see with an example how this works..

Open an account record in Dynamics 365 and inside the account record,

Click on the recent opportunities subgrid and create a new opportunity, check the currency for that opportunity, its CADDOLLAR.

Now click on the settings icon on the right side of the  web page and you will be prompted with the settings > click on the options by default the currency will be the base currency, you can change to the different currency “AUDDollar”and all the “opportunity, quote, order , invoice” will only be i.e “AUDDollar”.

Now create new opportunity for the “Fabricam” account then the currency will be automatically set to be a “AUDDollar” only.

So if you scroll down to the Product line items then there is no price list items, why because we have changed the default currency to “AUDDollar” and the price lists are relay on the currencies. The only we can use “AUDDollars” is we need to associate the price lists with “AUDDollar” currency.

Always remember when working with multiple currencies and multiple price lists and even multiple discounts, some form of planning should be necessary when creating the price lists.

Create a new price list the default currency will be “AUDDollar” Currency, as we have changed the default currency to “AUDDollar”. then scroll down to see the price list item  subgrid and click on the + symbol and create thge price list item as you can see on the below image the currency will be the “AUDDollar”  and select the Product from the lookup, unit , Amount  save and close.

Go back to the opportunity “Need some Pendrive” and add product line item. you can also add products to it.

So when working with multiple currencies and multiple price lists , it is very tricky but it does allow you to maintain your customers who might span across the world.

I hope this helps..

Share this:

BULK EDIT OF DYNAMICS 365 RECORDS ON EXCEL ONLINE

Hello

If there is any requirement to bulk edit of the CRM Records then we can achieve this functionality within Dynamics 365 without any external tools..

Suppose you have a requirement to bulk edit of  “Accounts” on Dynamics 365..

Navigate to Dynamics 365 Sales > Accounts >
View > Active Accounts

Select all Accounts and click on “…” then click on the “Export to Excel”, you will get some options, select the “Open in Excel Online”

Once all the records are inside Excel Online.. update the changes on the records and the click on the “Save changes to Dynamics 365” Icon..

Once you have updated the records then all the changes will be effected inside Dynamics 365.

Then navigate to Dynamics 365 > Sales > Accounts >

Here you go.. the changes effective on the Dynamics 365 Accounts Records..

This feature is very much handy when any crm users needs to update records without export of the records and update them and then  reimport back into Dynamics 365.

I hope this helps..

Share this:

POWER BI INTEGRATION WITH MICROSOFT DYNAMICS 365

Hi Guys,

Today i am going to show and explain you how to integrate Dynamics 365 with Power BI Out of box..

First of all you need to enable the integration so go to Dynamics 365 > Settings > Administration > System Settings >Select  Reporting Tab

That’s all we need to configure in the Dynamics 365..

We are going to connect to one of the Content Packs made for Dynamics 365 inside Power BI, so we need the OData feed from D365. Go to Settings-> Customizations ->Developer Resources:

From the above image copy the url..upto the .com…

Login to the Power BI and Login with the same account as you logged into Dynamics 365.

Open up the side bar menu and go to the Get Data

Under the Content Pack Library:

Select Services:

Then you will be prompted with the below page and search for Dynamics 365 .. and select the Customer Service Analytics for Dynamics 365..

You will be prompted with the following page and click on the get in now button..

Again new pop up will come up and place the url copied from the developer resource of Dynamics 365

https://yourcompany.api.crm11.dynamics.com


Click on Next button then you will be prompted with the below pop up ..
In the pop up , Select Authenticated Method =  ” oAuth2 ” and the click Sign in.


Then you will get sign in page and select the login credentials that you have used for the Dynamics 365 and Power BI

Click on the credentials then …

After few minutes you will be prompted with beautiful dashboard..

Yahoo!.. we have powerful and very useful dashboard is ready to view..

Then head back to Dynamics 365 > Services > Dashboard.. then Click on the “NEW” dropdown..
you will be prompted with “Power BI Dashboard” select it..

After clicking on the Power BI Dashboard ..

Then check the box for enable for mobile and click on save button..

Here you go .. you can see “Customer Service Analytics for Dynamics 365 Dashboard.. at the moment on the current dashboard 10 underlying reports and if you want to go back to Power BI, you can click on the top right side button ” OPEN IN POWER BI”.. then you will in POWER BI again..

This is very cool….

 if you want to share this dashboard with other colleagues in your organization you’ll have to share the dashboard in PowerBI. Then the users can import it to their personal dashboard inside D365, so security is pretty much handled by PowerBI. The content packs made by Microsoft gives you a great starting point for reports, I recommend  every one of them

As always, if you need any help,

Please contact us @ www.gmritsolutions.co.uk
Email: Admin@gmritsolutions.co.uk

Share this:

MICROSOFT PORTAL INVITE MULTIPLE CONTACTS

Hi Folks..

Today i am going to show you and explain how to invite multiple contacts in a single invitation..

Let’s get started..

In the Microsoft Dynamics 365

Go to Settings > Portal > Invitations

Click on the new button then new page will be prompted..

Then from the above image, you can see name = “Test Portal Invitation”, Type=”Group”, and save the record and then in the sub grid “Invited Contacts” select two contacts from the search icon inside the sub grid.

Then scroll the page and you can see in the “Activities” area click on the activities tab and you can see two emails with the invitation code inside, these email can be manually or automatically sent to the contacts.

Once the contact receives the email and access the code via the portal url
Portal URL example:  https://yourcompany.microsoftcrmportals.com

Invitation code looks like below:

You have been invited to our portal. To redeem your invitation, please click the link below.

https://yourcompany.microsoftcrmportals.com/Register?ReturnUrl=%2f&invitation=zzFn2uUYDEcco-wPPN30UrbyKRImBlHDC1hveXD3O7ooLydqmOGJQm6eZ6H9s-Pvb1pcgVnxa7zYHlzfJ3SYgtoiGwl7KxmRiRtj0N1NFRlnvvFsf84MpIi8WY4wa3vnA0Fmv4wNDF6PfloYoquoc0JMfVvL9qKosfq20k8EsGY-

Regards,
Portal Team

Once you login into the portal as below image:

So i hope this scenario helps when you want to send multiple invitations within the organisation..

Happy CRMing.

We are Microsoft, Click Dimensions, and Scribe Partner, if you have any Development, Support, Training , Integrations or Small Piece of work.
Please contact us :
www.gmritsolutions.co.uk
admin@gmritsolutions.co.uk

Share this: