Menu Close

Category: Blog

{Do you know} Adding questions, keywords and associated browsing in Teams meeting recap

Hello Everyone,

Today I am going to share my thoughts on adding questions, keywords and associated browsing in Teams meeting recap.

Let’s get’s started.

Certainly! The Copilot for Sales post-meeting summary, integrated within a Microsoft Teams meetings recap, offers a convenient hub for sellers to review their customer meetings.

Here’s what it includes:

1. Sales Explicit Keywords and Implicit Mentions: Tracked keywords identified by organizations and out-of-the-box mentions(such as brands, people and time).

2. Sales Questions: Questions asked by participants (both customers and sellers) during the meeting.

3. Recording Timeline Access: Sellers can select points of interest and quickly reach them in the recording timeline.

That’s it for today.

I hope this helps.

Malla Reddy Gurram(@UK365GUY)
#365blogpostsin365days

Share this:

{Do you know} Collaborate with sales teams using AI-powered planner tasks in Microsoft Copilot for Sales.

Hello Everyone,

Today I am going to share my thoughts on Collaborae with sales teams using AI-powered planner tasks in Microsoft Copilot for Sales.

Let’s get’s started.

AI-powered planner tasks can significantly enhance collaboration within sales teams. Here’s how it works:

1. Automated Prompting: The Copilot for Sales bot in Microsoft Teams channels automatically scans conversations for relevant discussions and action items. When it identifies potential tasks, it prompts you and other sales team members with a notification, seeking your agreement to create the tasks.

2. Task Creation and Assignment: Once you agree, the solution automatically creates Teams tasks (planner tasks) based on the identified action items. A preview of the tasks is shown to you, the user creating the tasks. These tasks are then assigned to relevant users, ensuring accountability.

3. Planner App Integration in Teams: Sales team members get a centralized view of all the tasks by pinning the planner app to the Teams channel. These tasks can also be accessed directly from the planner app.

This solution streamlines task management, improves collaboration, and enhances productivity for sales teams .

It works for Dynamics 365 Apps.

That’s it for today.

I hope this helps.

Malla Reddy Gurram(@UK365GUY)
#365blogpostsin365days

Share this:

{Error} Selected in the From field does not have the option enabled to allow other users to send the email on their behalf

Hello Everyone,

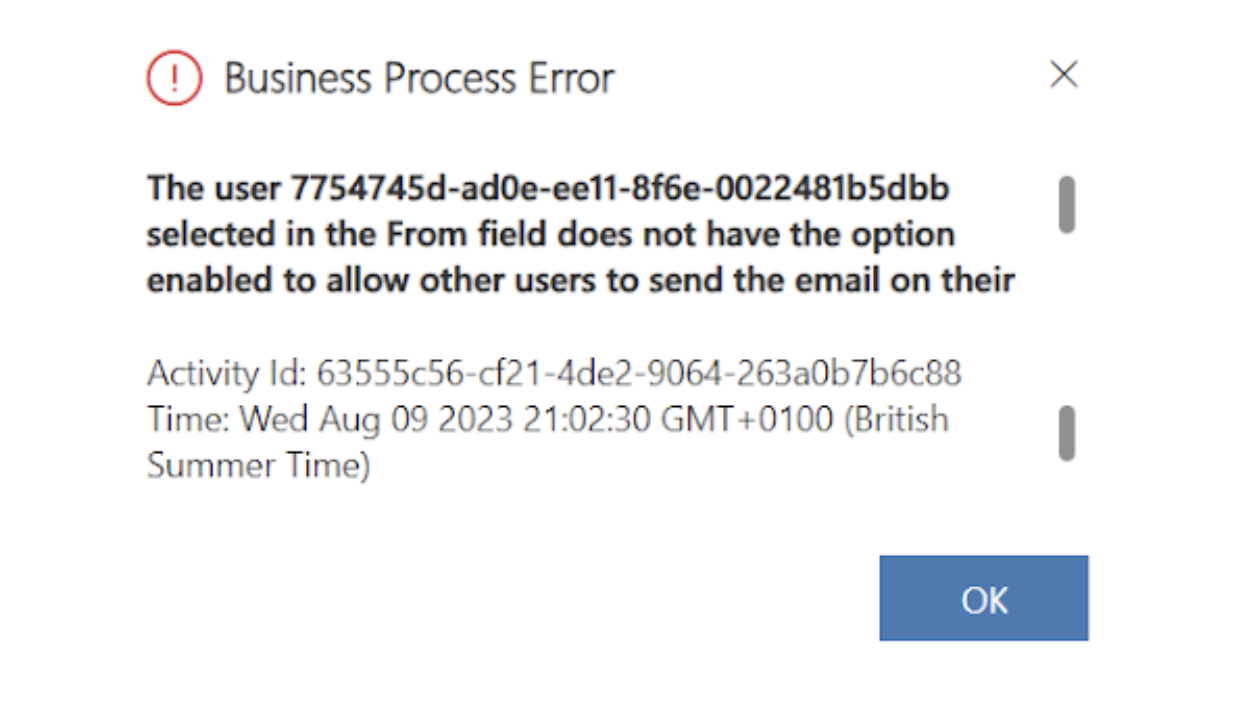
Today I am going to show how to resolve the error “Selected in the From field does not have the option enabled to allow other users to send the email on their behalf on Dynamics 365 Customer Service App.

Let’s get’s started.

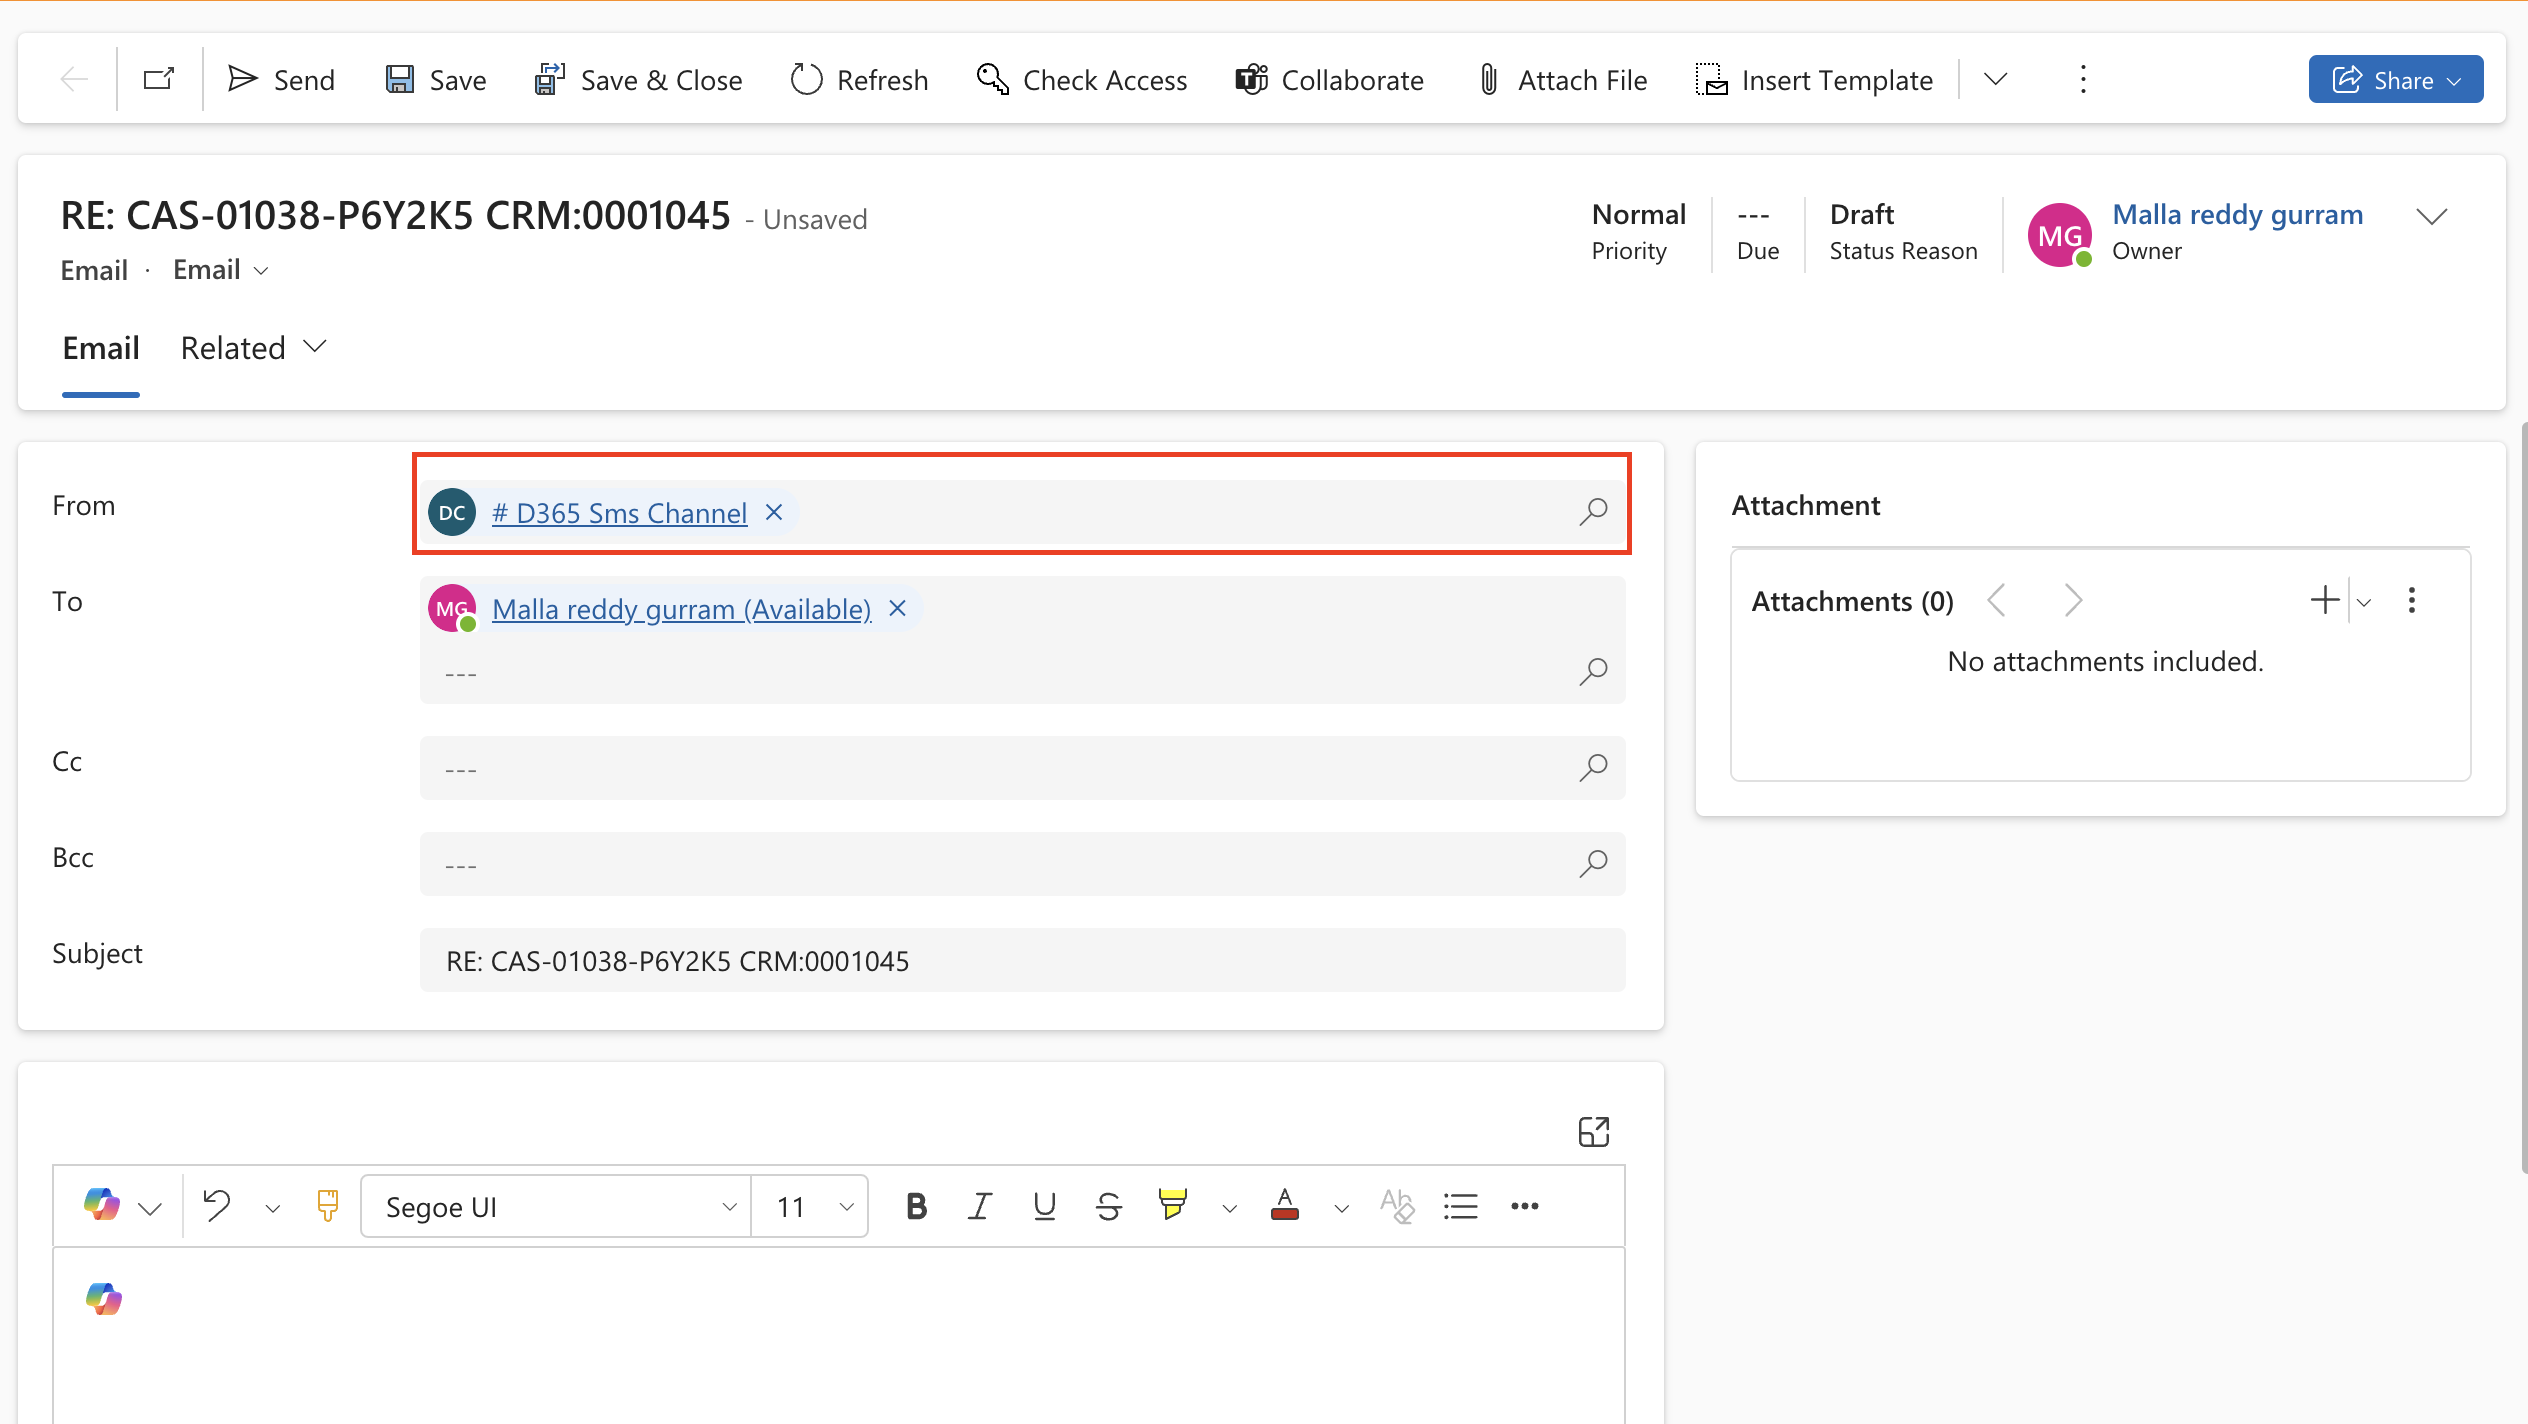
Suppose you have a user account on Dynamics 365 Customer Service where that user is set as default on From field whenever you reply to customer on case record.

Error is popups when you try to send email : From field does not have the option enabled to allow other users to send the email on their behalf on Dynamics 365 Customer Service App.

How do we resolve this error message:

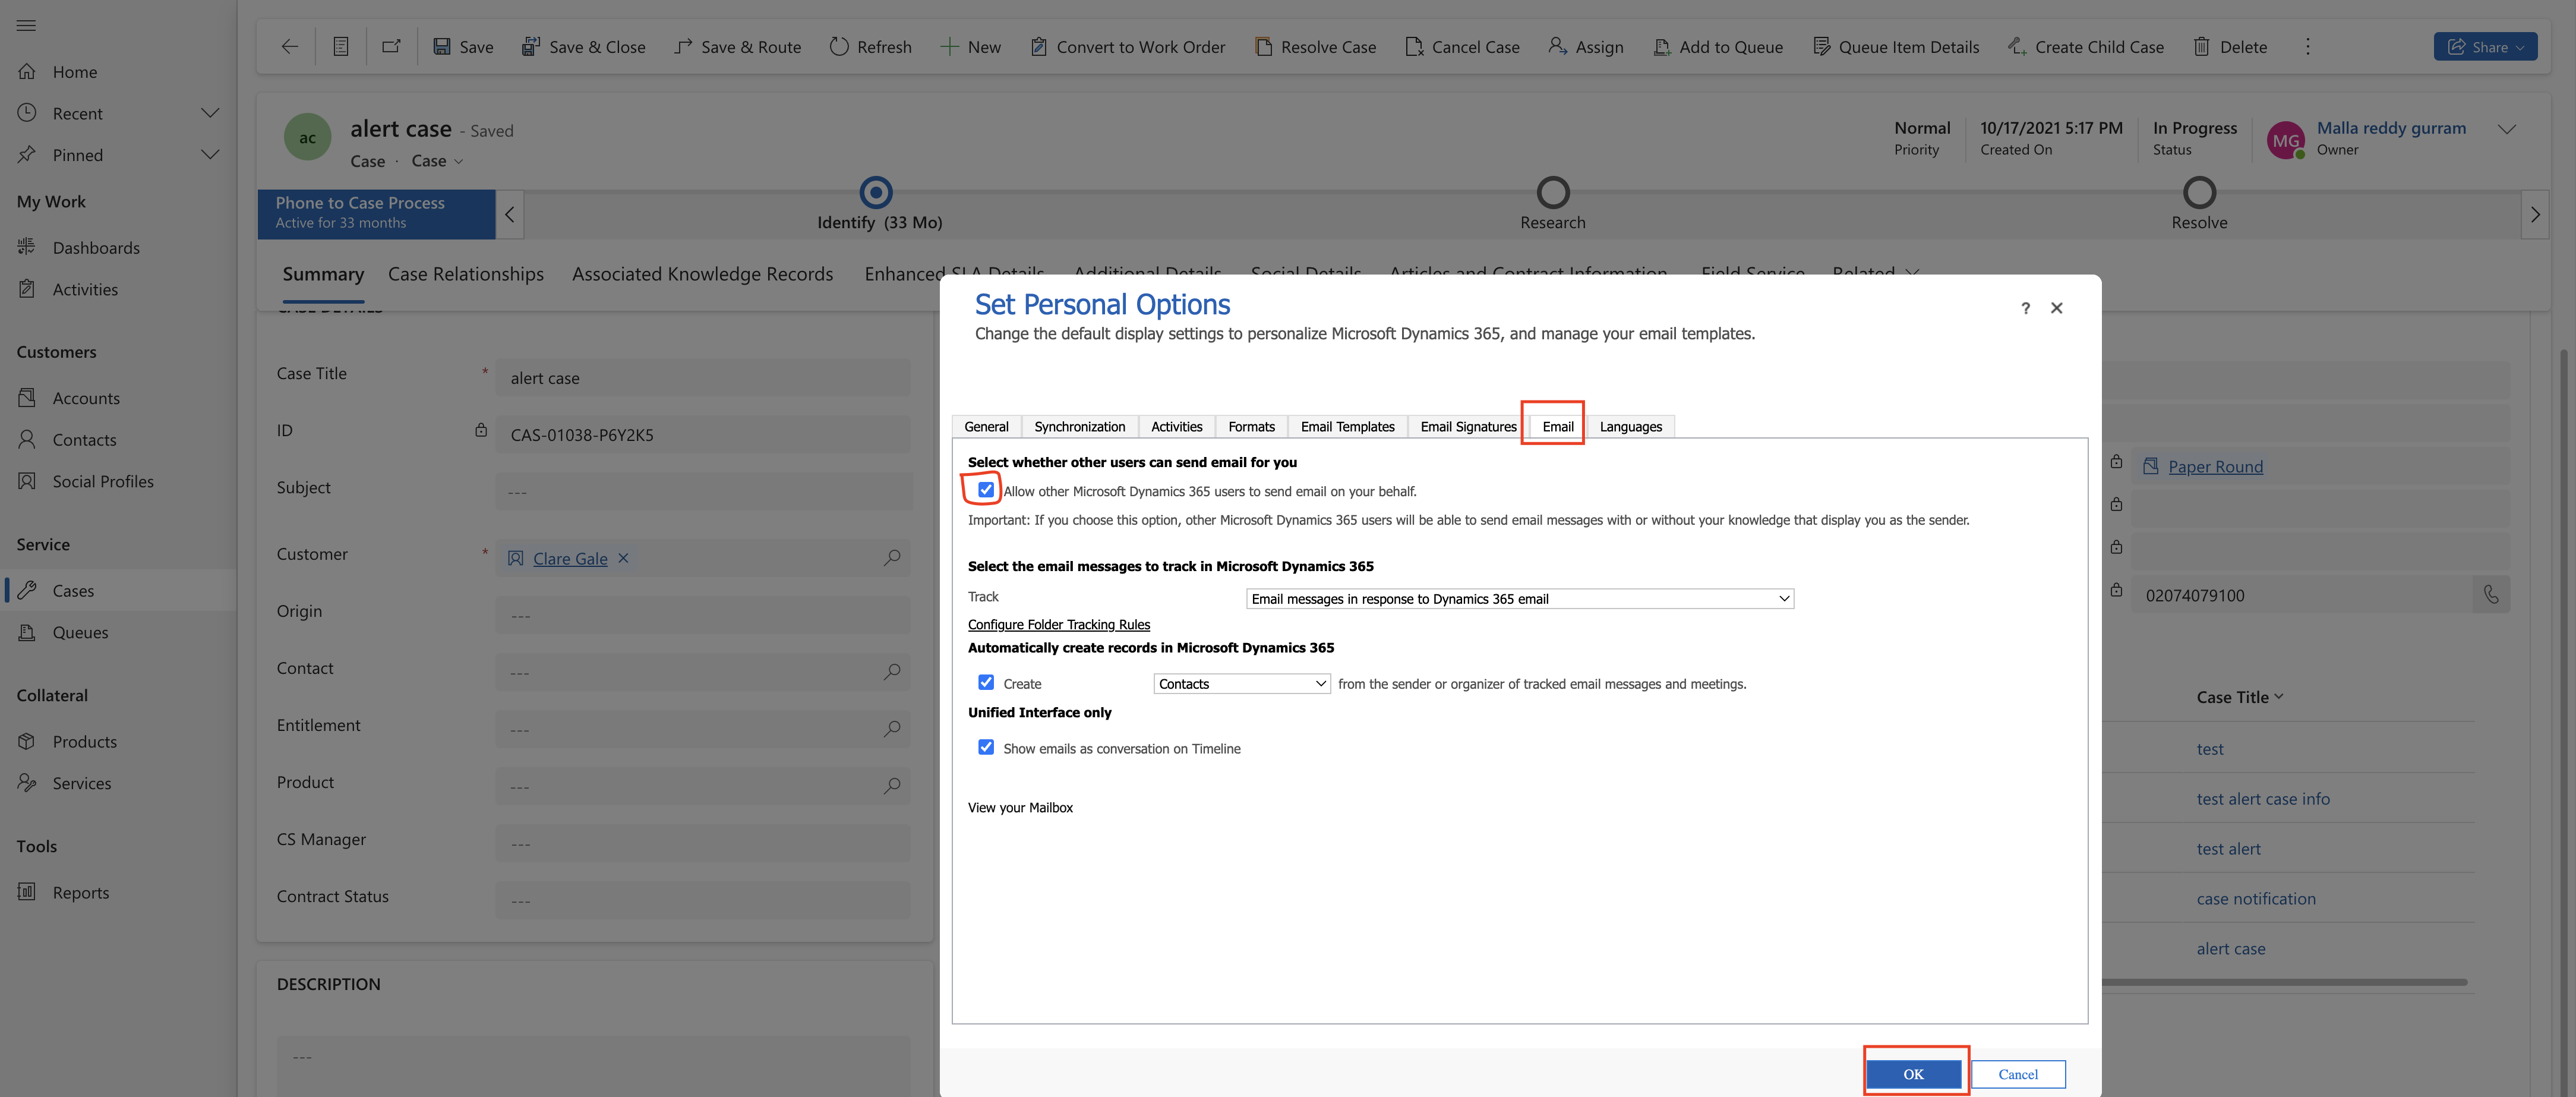
I have logged on to Dynamics 365 Customer Service App with the FROM field user credentials and changed the personal settings Allow other Microsoft Dynamics 365 users to send email on your behalf and click ok.

Then the error will be gone.

That’s it for today.

I hope this helps.

Malla Reddy Gurram(@UK365GUY)
#365blogpostsin365days

Share this:

{How to} Track more fields as part of saving emails or events to CRM Microsoft Copilot for sales

Hello Everyone,

Today I am going to share my thoughts on tracking more fields as part of saving emails or events to CRM Microsoft Copilot for sales.

Let’s get’s started.

Certainly! To track additional fields when saving emails or events to your CRM using Microsoft Copilot for Sales, follow these steps:

1. Access Admin Settings:

As a Copilot for Sales admin, open the Copilot for Sales app in Teams.

Navigate to the admin settings.

2. Choose Activity Type:

In the admin settings, select “Save to (CRM).”

Depending on the type of activity you want to configure (emails or meetings), choose either “Save emails to (CRM) or ” Save meetings to CRM”.

3. Select Fields to Save:

You can now select different fields to save along with the email or meeting to CRM.

These selected fields will be displayed to sellers when they save the email or meeting to CRM.

4. Refresh Data(Optional):

If the CRM administrator updates a field label in CRM, you can refresh the data to see the updated label in Copilot for Sales,

5. Categorize with Fields:

In the “Categorize with fields” section, add the desired fields from the available options.

These fields allow sellers to accurately categorize their interactions with customers.

And that’s it! Sellers will now see the configured fields when saving emails or meetings to CRM.

That’s it for today.

I hope this helps.

Malla Reddy Gurram(@UK365GUY)
#365blogpostsin365days

Share this:

{Do you know} Automatically save attachments when saving emails to CRM Microsoft Copilot for sales

Hello Everyone,

Today I am going to share my thoughts on automatically save attachments when saving emails to CRM on Microsoft Copilot for Sales.

Let’s get’s started.

Certainly! When you save an email to your CRM platform from Copilot for Sales, any attachments are automatically saved along with the email.

This feature ensures that crucial context, such as request for proposals(RFP’s) stays linked with emails in your CRM.

By preserving this context, you enhance your ability to access vital information effortlessly, fostering deeper insights and smoother collaboration.

This improvement eliminates the manual process of saving attachments to your CRM, allowing sellers to stay in the flow of work.

That’s it for today.

I hope this helps.

Malla Reddy Gurram(@UK365GUY)
#365blogpostsin365days
Share this: