Menu Close

Category: Blog

Microsoft Dynamics 365 Customer Insight on Admin Center

Hi Everyone,

Today i am going to share my knowledge on “Customer Insights” related to  Microsoft Dynamics 365 for Customer Engagement.

As you all know prior to the Microsoft Dynamics 365 for Customer Engagement Version 9.0, there is a Customer Insight App which is used to get the statistics of the Dynamics 365… as this feature will be deprecated with the up coming versions.

So Microsoft have implement the Customer Insight on the Common Data Service Area of the Microsoft Dynamics 365.

So let’s see this in action on  how you can access the Customer Insight on Admin Center.

Login to the
www.Portal.office.com 

Enter your login credentials.

then use the below url to go straight into the Common  Data Service Area:
https://admin.powerplatform.microsoft.com

As you can see the Common Data Service for App analytics:
You can explore the Active Users, Mode of Access, Entity Usage, System Jobs, Plug-ins, API calls statistics, Mail Usage, Storage.

On the left hand side of the above image you can explore Microsoft Flow, Power Apps, Environments, Data Integration, Data Gateways, Data Policies, Admin Centers..

I hope this helps.

For Microsoft Dynamics 365 Consultancy/Training/Support/Licensing
Contact us: https://www.gmrit-solutions.com
Email: info@gmrit-solutions.com

Share this:

How to Integrate Dynamics 365 with WordPress Website

Hi Everyone,

Today i am going to share my knowledge on how to integrate Dynamics 365 with WordPress website and capture the contact us form details as a lead in the Dynamics 365.

Let’s gets started.

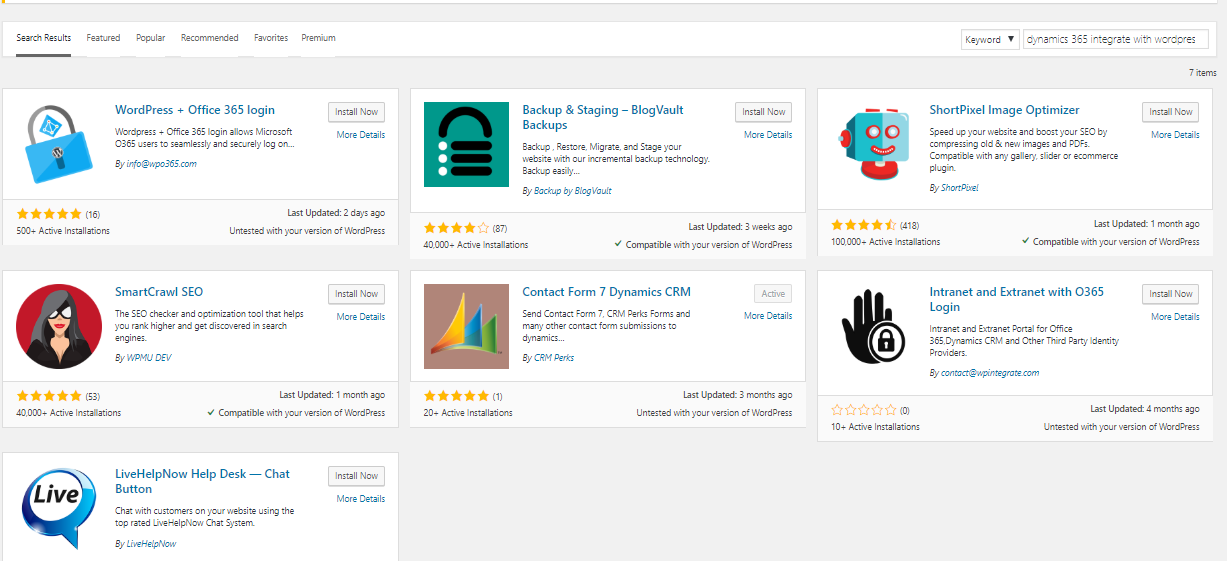
Login to your WordPress  Dashboard and click on the plugin  and search for Dynamics 365 integrate with WordPress website…

Your search result will fetch the following result:

Choose the “Contact Form 7 Dynamics CRM.

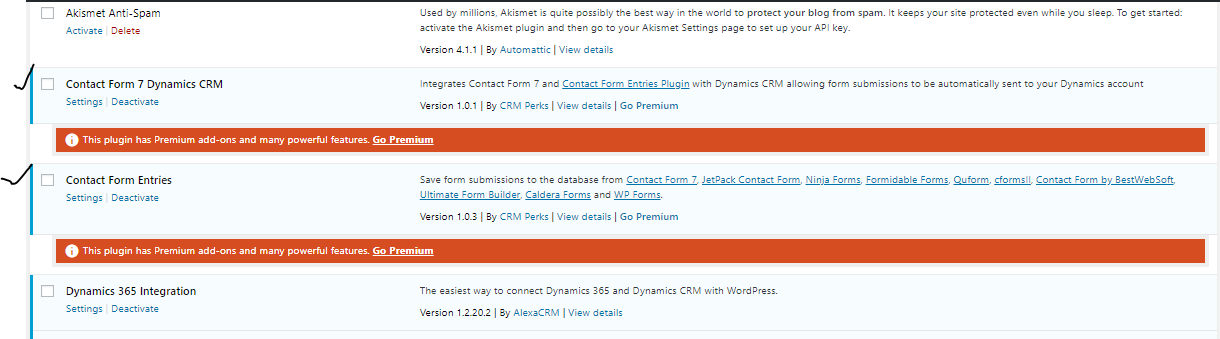
Once the Plugins are activated, click on the “Installed Plugins” on the WordPress Dashboard then you will see installed plugins like below image:

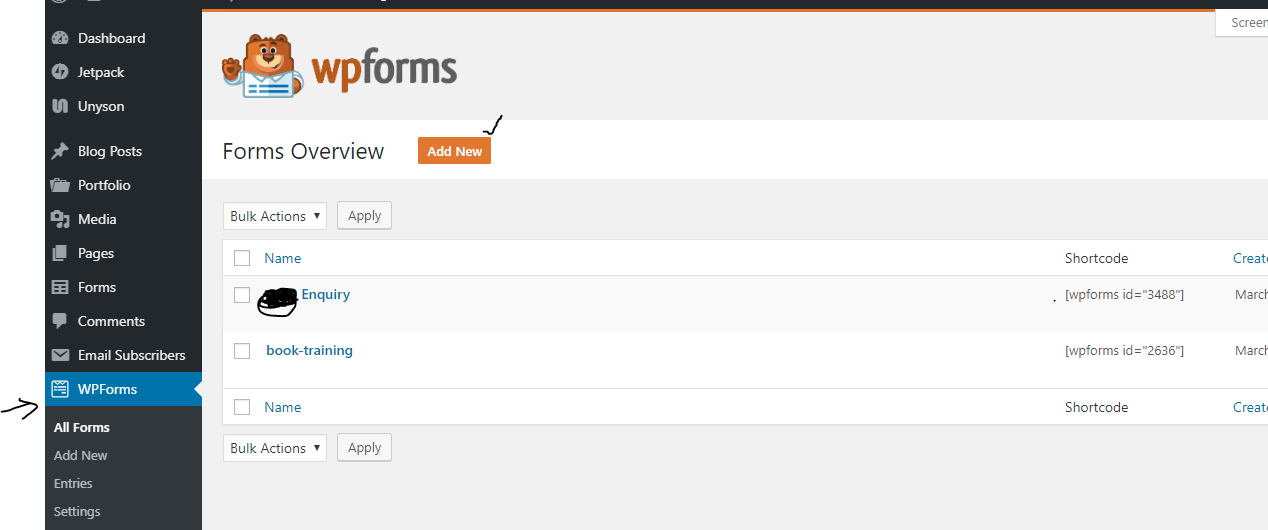
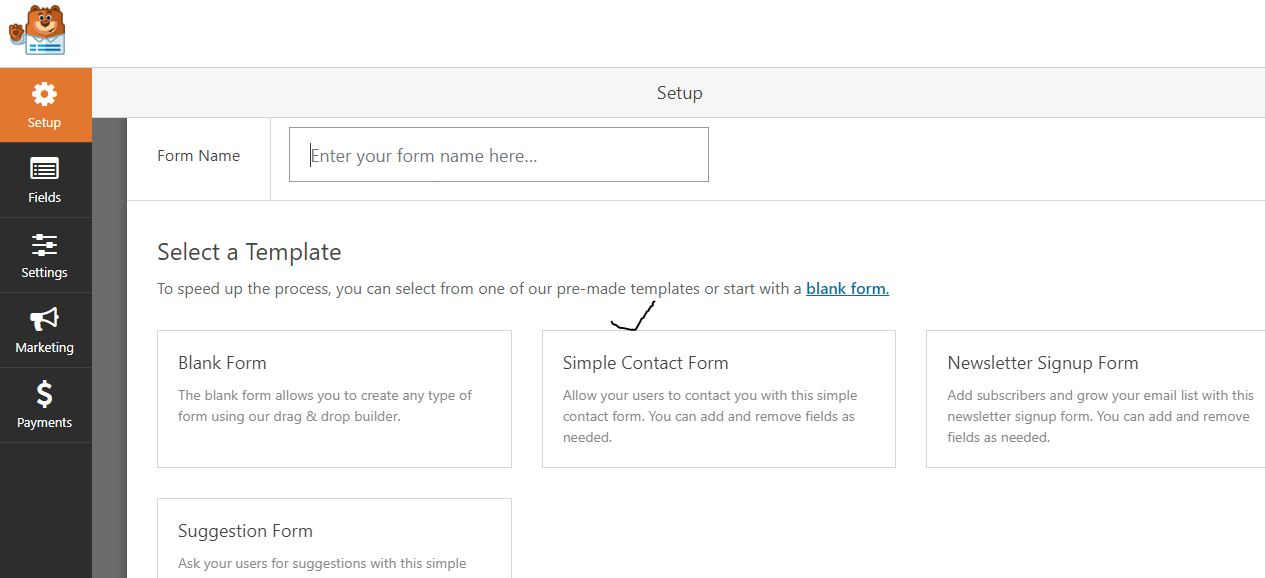
Then you need to go the WordPress Dashboard and click on the “WPForms” on the left hand side and create a new form:

Click on the Add New button and click on the “Simple Contact Form”

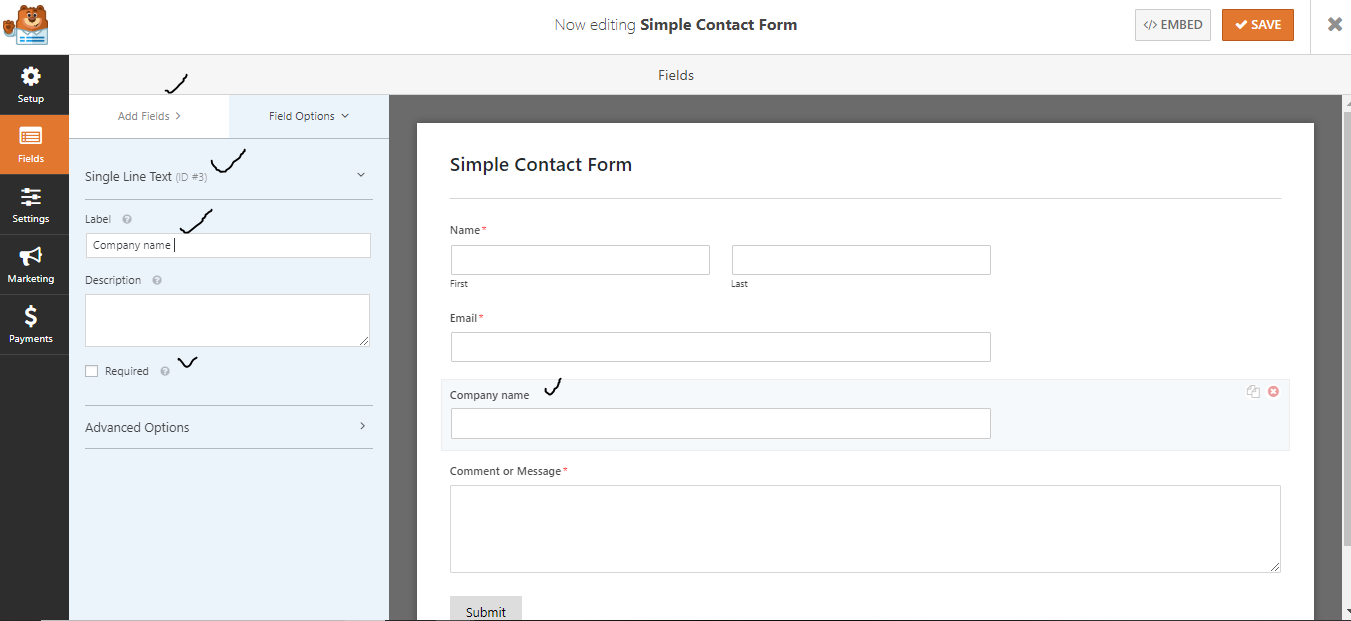
Once you click on the Simple Contact Form you need to drag the fields on to the left hand side of the form.

You can choose the type of field as you like from the “Add Fields” Area like “Single Line of Text”, “Drop down” , “Multi Line of Text” etc..

For example if you choose “Single line of text” and drag it to the right hand side of the Contact form” then you can rename the field as you like according to your requirement.

As you can i have highlighted the fields area and update accordingly and then save the configuration by clicking the “Save” Button on the top right hand corner side.

Let’s move on to the Dashboard and click on the “CRM Entries”

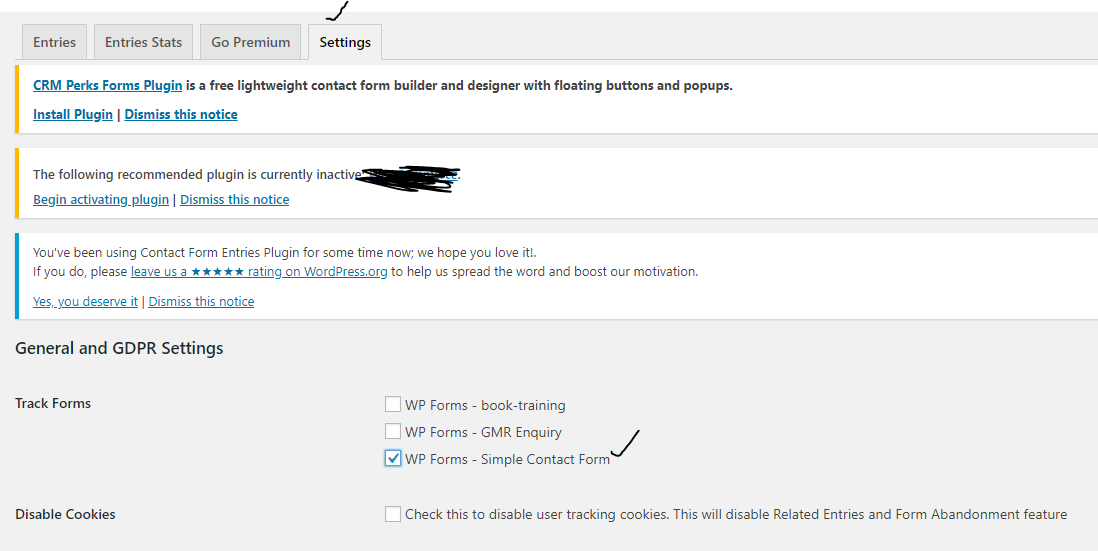
Once you click on the “CRM Entries” then you will need to click on the “Settings” Tab and check the ” Simple Contact Form” as we have designed earlier..and click on the “Save Changes” Button on the same screen that you are currently viewing..

Go back to the Dashboard and click on the Dynamics CRM 

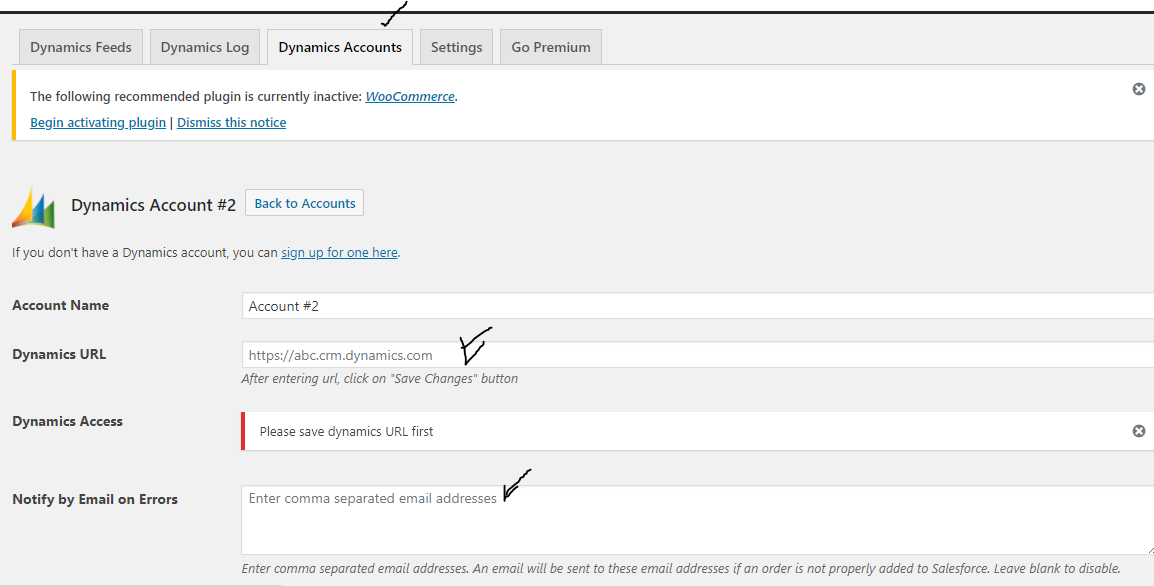
You will need to click on the “Add New Account” Button then you will need to give the Dynamics 365 Credentials :

Account Name,
Dynamics URL : Your Organisation URL
Notify by Email on Errors: You can supply your email address for the error notification.

then click on the “Save Changes” Button on the same screen.

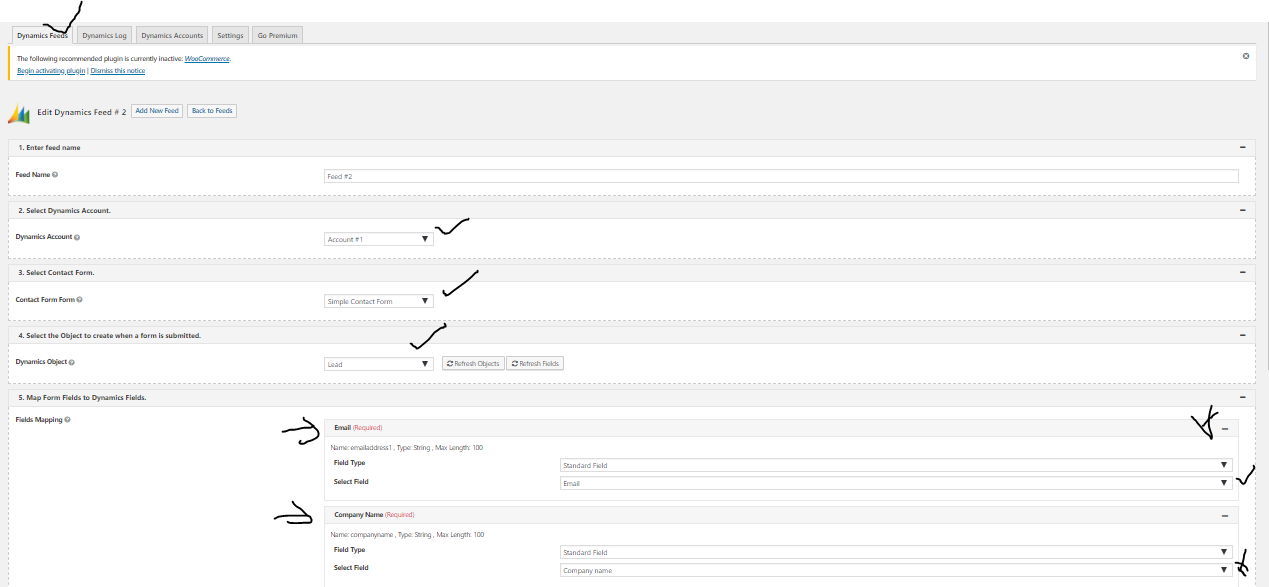
Then click on the “Dynamics Feeds” Tab and select the appropriate fields as shown on the screen below:
Choose the “Dynamics Account”, “Simple Contact Form”, “Choose the Dynamics Object” means the entity you want to send the captured data on the Website Contact us Form such as ACCOUNT, CONTACT, LEAD, CASE entities in Dynamics 365.

Then Map the fields of the Dynamics 365 like company name and email fields and click “Save Feed”..

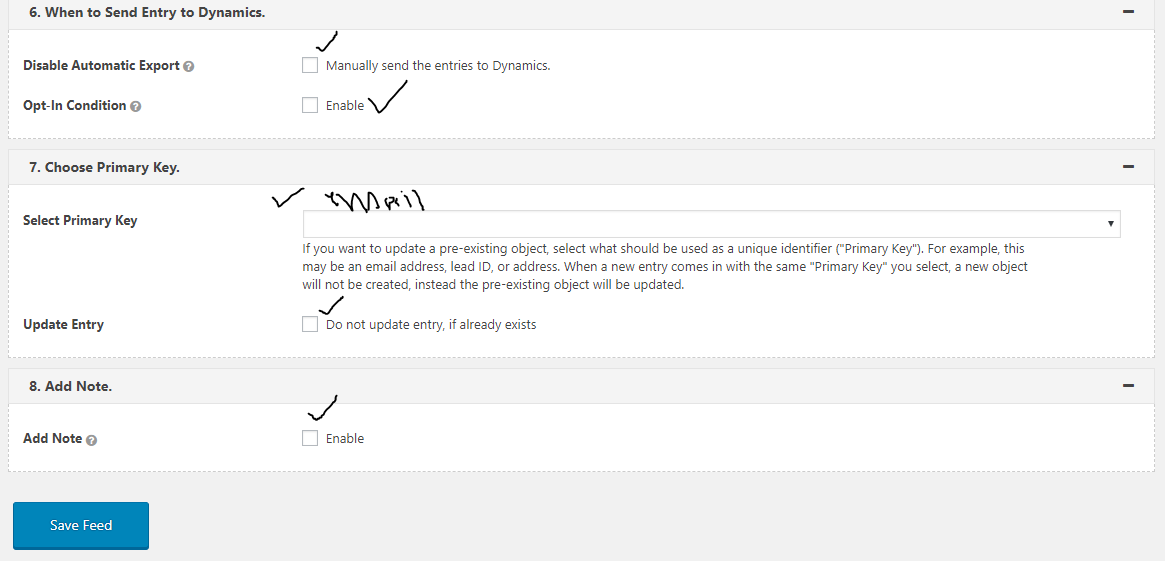
You can also set some condition when to create record in Dynamics 365 and add any conditions etc.. as shown on the below image:

You can disable automatic export of the captured data into Dynamics 365, Set Opt-In condition, choose the primary key for duplicate validation with email etc.. Update entry and you can add note, finally click “save feed”..

Go to the “WPForms” on the Dashboard and copy the  short code by opening the “Simple Contact Form”,

Then go to the Dashboard and click on the “All Pages” and choose the “contact us” page and insert the short code and update the page..

Finally go back to your website and fill in your contact us form and click “submit” button

I hope this helps.

For Microsoft Dynamics 365 Consultancy/Training/Support/Licensing
Contact us: https://www.gmrit-solutions.com

Share this:

How to resolve error while assigning Dynamics 365 Licenses in Office 365 Admin Center

Hi Everyone,

Today i am going to share my experience while assigning Dynamics 365 Customer Engagement license to the user in Office 365 admin center.

So let’s gets started.

Situation: Suppose a customer is using Microsoft Dynamics 365 P1 Trial for Information Workers and would like to add new instance subscription of Microsoft Dynamics 365 for Customer Engagement. then you will see below error message.

Because the Trail version having the Sharepoint 1 and New Instance is having the Sharepoint 2 licenses included, when you expand the licenses you will see them in the below image.
In order to resolve the error you need to turn off the Dynamics 365 P1 Trial for Information Workers Sharepoint(1) and assign the Microsoft Dynamics 365 for Customer Engagement license to the user including the SharePoint 2.
Then try to save the window. this time problem will be resolved.
I hope this helps.
For Microsoft Dynamics 365 Consultancy/Training/Support/Licensing
Contact us: https://www.gmrit-solutions.com
Email: admin@gmritsolutions.co.uk

Share this:

Microsoft Dynamics 365 CE Admin Center Microsoft Search

Hi Everyone,

Today i am going to share new findings from the Admin center.

When  you login to portal.office.com, see below

When you click on the Admin icon:

Click on the “Microsoft Search” on the left hand side:

then the Microsoft Search – Admin Portal:

Here you can see the user & permissions, who is having Admin rights, Editors and Preview users.

Also the Connected Devices:

Content Settings:

See from image: you can see the organisation name, you can insert the”logo”, choose the color of your choice, email feedback and query suggestions.
Finally the tools section looks like below:
I hope this might make you aware of the feature from Office 365 admin center.
For Microsoft Dynamics 365 Consultancy/Training/Support/Licensing
Contact us: https://www.gmritsolutions.co.uk
Email: admin@gmritsolutions.co.uk

Share this:

Microsoft Dynamics 365 for Field Service – Resco Mobile Inspection new features

Hi Everyone,

Today i am going to share some information about the Resco Mobile new features.

As you all know Microsoft Dynamics 365 for Field Service uses Resco Mobile for Field Technicians communication with back office systems(Dynamics 365).

Recently Resco.net released new features related to Mobile as follows:

 Resco inspections helps with field inspection scenarios

  • You can design and develop highly structured questionnaires. Also the look and feel are entirely in your hands.
  • Dynamics questionnaires with functional blocks that are triggered by events, you can use rules for visibility, data validation, dynamic styles, and more.
  • You dont need to afraid of going into offline mode as the inspections can work offline.
  • Inspections can connect to any external data source i.e Dynamics 365, Salesforce or any CRM Systems.

Designer: 
A tool for designing and developing any type of questionnaires.
Scheduler:
You can assign the questionnaires to any of  your field techinican to see their progress.
Inspector:
An offline-ready app for inspectors with questionnaires, calendar and navigation purposes.
Analyst: 
So all the data and required reports and statistics are in the form.
I hope this helps.

For Microsoft Dynamics 365 Consultancy/Training/Support/Licensing
Contact us: https://www.gmritsolutions.co.uk
Email: admin@gmritsolutions.co.uk

Share this: