Menu Close

Category: Blog

Points to remember Fields in Microsoft Dynamics 365 Field Service – Work Order Creation.

Hi Everyone,

Today i am going to share few points, these points needs to be remembered.

Let’s get’s started.

In the Microsoft Dynamics 365 Field Service, when you create new Work Order the following fields needs some attention and needs to be taken into account.

Work Order Type: Type of Work Order (Inspection, Break Fix, Install etc.)

Price List: Price List attached to the Work Order

Priority: Priority Level(Low, Normal, High)

Work Location: Location where the work will be taking place.]

Related to: Other records related to this Work Oder
 . Parent Work Order
 . Agreement
 . Opportunity
 . Case

Preference: Specific time and date preferences for this work order.

I hope this helps.
For Microsoft Dynamics 365 Consultancy/Training/Support/Licensing
Contact us: https://www.gmritsolutions.co.uk
Email: admin@gmritsolutions.co.uk

Share this:

Microsoft Dynamics 365 Field Service Work Order Relationships

Hi Everyone,

Today i am going share some information about the “Work Order” Relationships.

Let’s get’s started.

Work Order Types– Categorize Work Orders(Installs, Repairs, Preventative Maintenance)

Priority – Rates the importance of the Work Order. Can be configured and increased or decreased as needed; reflected on Schedule Board.

Service Territory – Organize Work Orders and resources by geographical area.

Incident – Common issues that a customer could report

Product – Items that may be needed for the issue

Service – Determines the services required to complete the Work Order.

Service Tasks – Check list or step by step instructions

Characteristics: Skills, Knowledge or certification required.

I hope this helps.
For Microsoft Dynamics 365 Consultancy/Training/Support/Licensing
Contact us: https://www.gmritsolutions.co.uk
Email: admin@gmritsolutions.co.uk

Share this:

Microsoft Dynamics 365 Field Service Work Order Life Cycle

Hi Everyone,

Today I am going to discuss about the Field Service Work Order Life Cycle Process

Let’s get’s started.

Work Order Life Cycle:

1) Work Order Creation:

What happens: New Work Order created, Assigned incidents, products, services, etc.

Who Performs: Agreement: Auto generating or recurring

Case:Work Order can be created from Case entity.
Opportunity: Work Order can be created from Opportunity entity.
Manual:

Work Order can be generated from sales or service or manually.

Work Order Status: Open- unscheduled
Booking Status : N/A

2)Schedule:
What Happens:
Bookable resource booking created.
Resource assigned.
Date and time specified.

Who Performs:
Dispatcher(Manually).
Field Agent(manually or mobile).
Dispatcher with help of scheduling assistant.

Work Order Status: Open – Scheduled
Booking Status: Scheduled.

3)Dispatch:
What happens:
Field Agent notified of Work Order.
Who Performs: Notification sent by system to Field Agent, customer or others

Work Order Status: Open – scheduled
Booking Status: Scheduled(Custom Status)

4)Service:
What Happens:
Work Order carried out
Who Performs: Field Agent
Work Order Status: Open- In Progress > Open- Completed
Booking Status: Travelling, In Progress Completed.

5)Review/Approval:
What Happens:
Work done and information is accurate.
Who Performs: Supervisor/Manager.
Back office accounting.

Work Order Status : Open – Completed > Closed -Posted
Booking Status : Completed

I hope this helps.
For Microsoft Dynamics 365 Consultancy/Training/Support/Licensing
Contact us: https://www.gmritsolutions.co.uk
Email: admin@gmritsolutions.co.uk

Share this:

Microsoft Dynamics 365 Field Service Resco MobileCRM project publish points to remember

Hi Everyone

Today i am going to share few points which needs to be considered when publishing the Resco MobileCRM Project.

Open the Project you want to publish.

Be you are publishing to the correct version
  > In the Field Service Mobile Application, click about
  > Publishing to a higher version will break the mobile app.
  > You can publish multiple projects as needed.

Please note: If you are not seeing your changes in the mobile application, verify that a security role you are a member of had the appropriate permissions.

When you are publishing the changes make sure you select the correct the version otherwise you will the solution, but it can corrected by selecting the right version like 9.10 or 9.20 etc depends up on the different no of projects you have on the Field Service.

One more point to remember is if you are system administrator and you make changes to the solution and try to see the changes on the MobileCRM but if you can’t that might be the security role issue.

Go back to the MobileCRM and assign the sys admin role to yourself then you should be able to see the changes.

If you don’t publish the correct Mobile Version you will run into issues like “Metadata Error”, it could be any issue  and ultimately not going to push appropriately.

Final important point is to select the correct Mobile Version before publishing as the Field Service version is different from Resco Mobile CRM.

Then you open the Mobile App and re sync the metadata and check the changes made.

I hope this helps.
For Microsoft Dynamics 365 Consultancy/Training/Support/Licensing
Contact us: https://www.gmritsolutions.co.uk
Email: admin@gmritsolutions.co.uk

Share this:

Editing Resco MobileCRM Project in Microsoft Dynamics 365 Field Service

Hi Everyone,

Today i am going to share my finding on the Resco MobileCRM Project Configuration.

Editing Resco MobileCRM Project:

Select a project and click edit:
You can edit can configure many items including:
   The application home screen.
   Entities available in the mobile application.
   Forms, view, and dashboards displayed in the app.
   Application theme color.
   Password policies and initial configuration.

Note: The Microsoft Dynamics 365 Service and Field Service entities are by default enabled and OOTB sales entities are not enabled for the Resco MobileCRM based on the License agreement between Microsoft and Resco. Custom Entities can be enabled for Resco MobileCRM but we are limited to 10 custom entities.

The Field Service entities are by default enabled and we can edit the Fields, Forms, Views and Dashboards on the Mobile App.

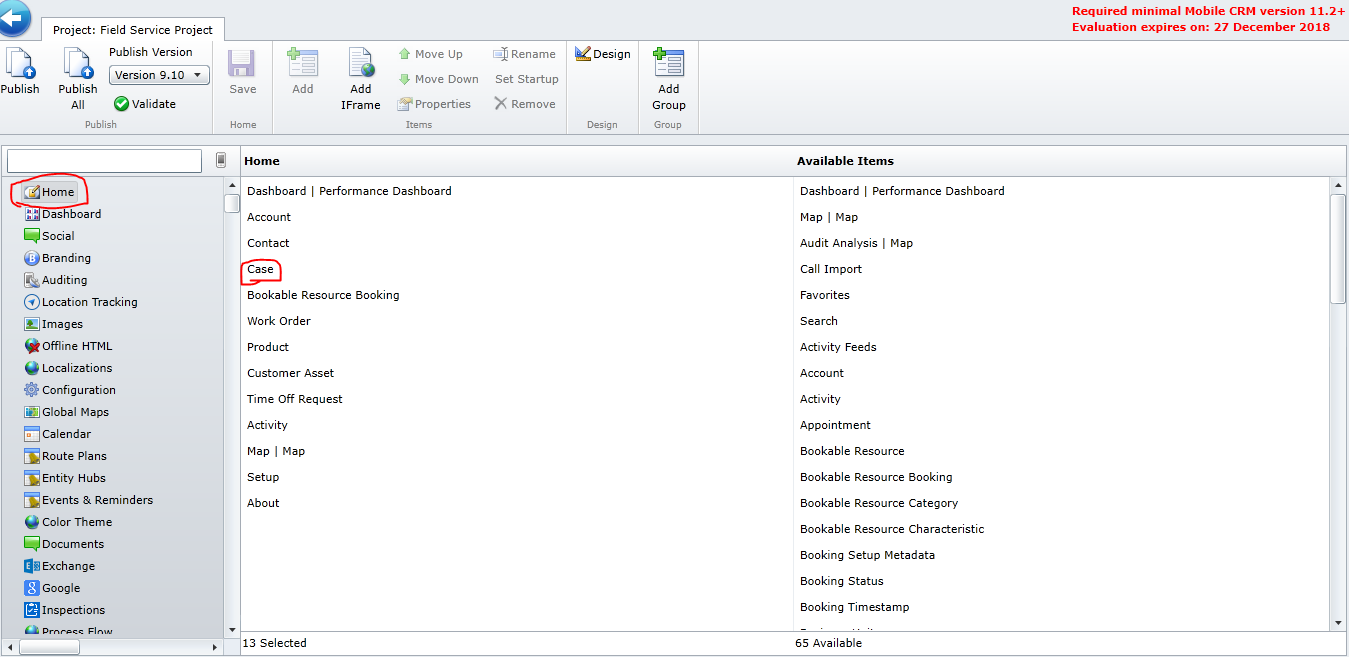
If you need to add more fields on the Mobile App then drag the “Available Items” from the right hand side on the image and place at “Home” side and Save the changes, if you don’t save the changes then the changed customization is not reflected on the Mobile App.

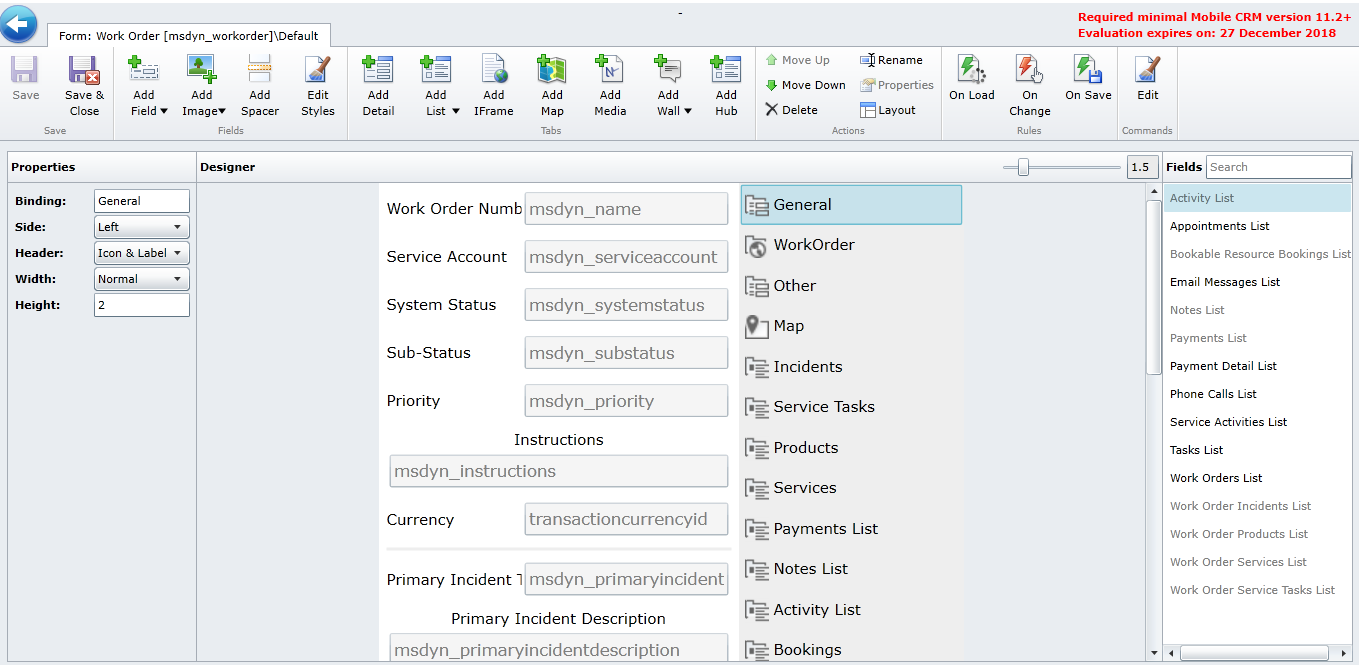
When you drag down the bar on the right hand side you can see all the entities enabled for Resco Mobile App, for example the “Work Order” have the “Forms”,”Views”, “Charts”, “Fields” and “Indexes”.

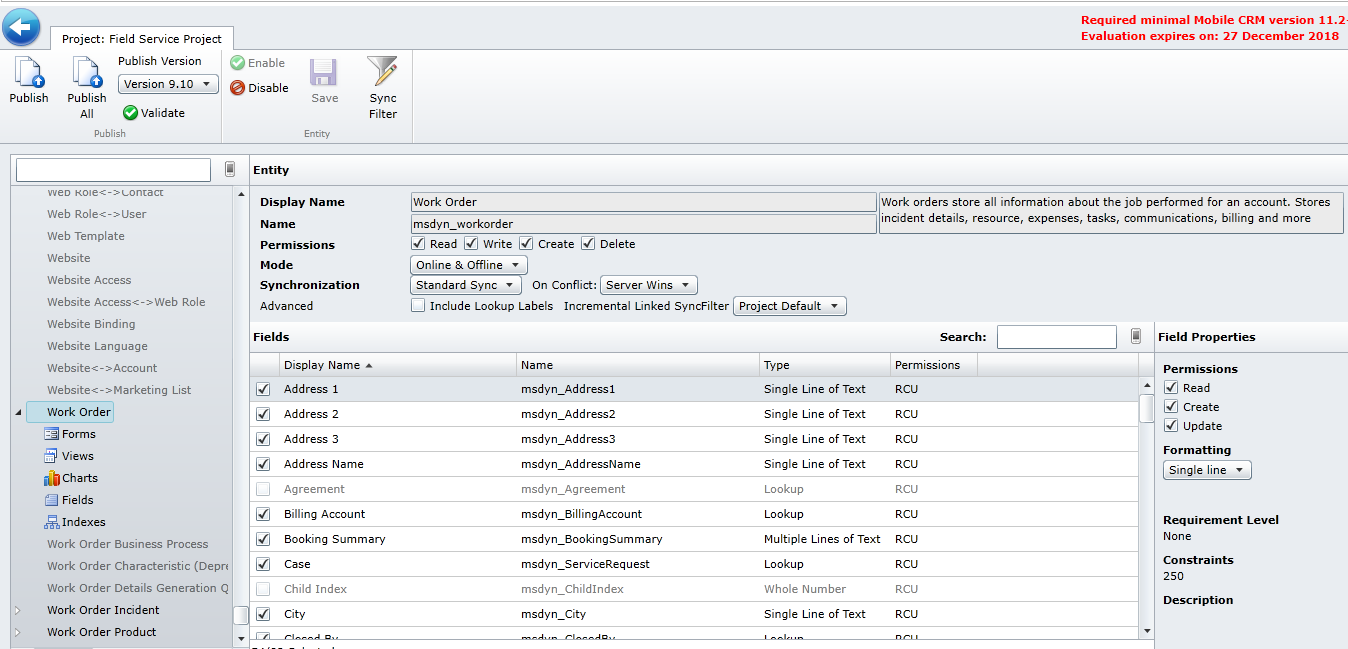
Let’s see what is inside the Work Order entity and what are the permissions enabled for the Mobile App user.

As you can see from the above image the check marked fields are enabled for the Mobile App and permissions are granted to the Mobile App users.

for example: if you have a requirement to attach a barcode code scanner then you can go ahead and attach that.

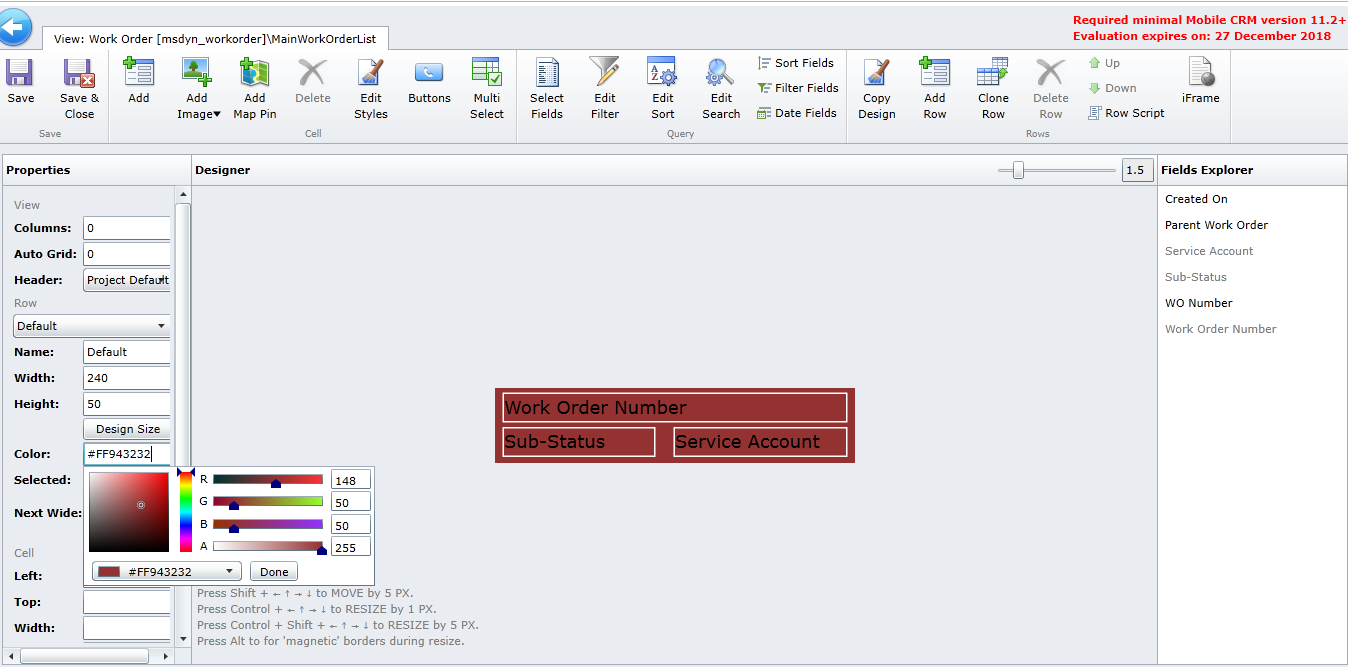
When you click on the “Views”, can see the views for that “Work Order” Entity, you can modify by double clicking on the view you want to modify.

Double click the view make changes you need anything to be changed see below image:

If you want to change the color of the view then you can make changes by clicking on  the color and select the color to reflect.

Also with the “Work Order” entity Form, if you need to make changes to the fields then double click on the “Form” and  you can see the different type of sections like “General”  with all the fields available in that section.

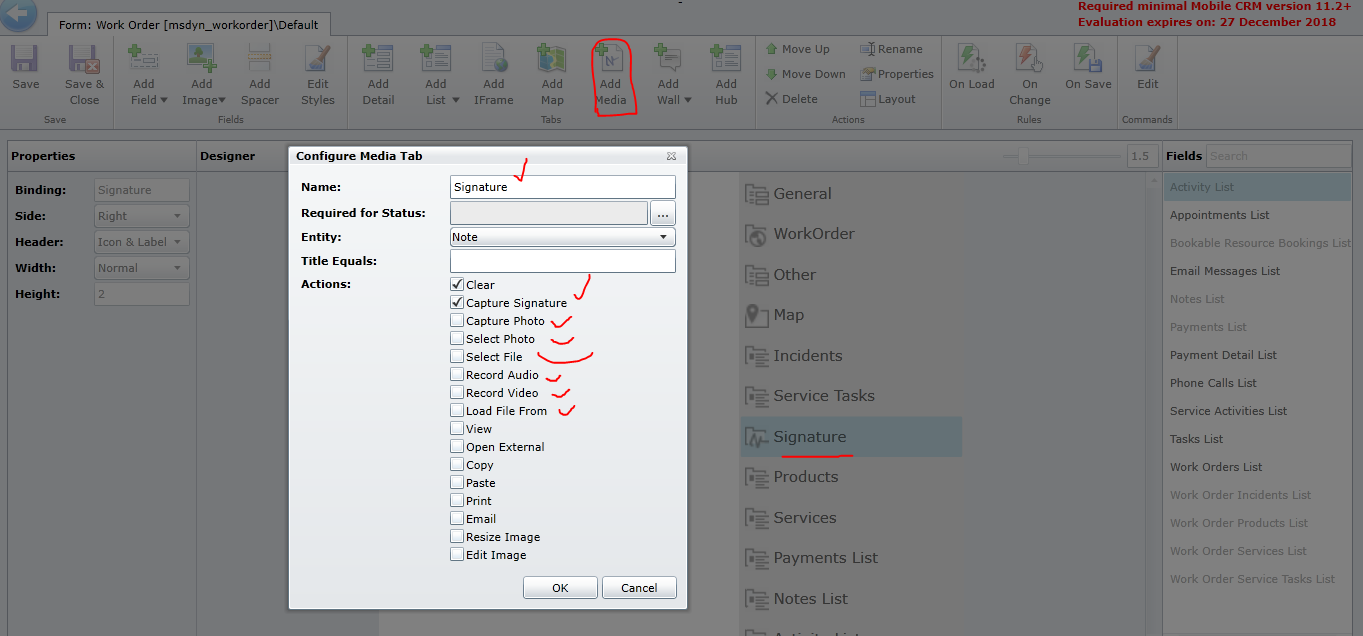
when you click on the other sub section like “Service Type”  are of sub grids, you can move the fields you need those fields on the sub grid, also when you click on the Signature section and click on the “add media” button on the navigation button and pop up will come up, then you can select the signature, photo, etc.. see below image.

Click ok and save the changes.

Application theme color can be changed according to business requirements on the Mobile CRM  by clicking on the “Color Theme” on the Mobile Solution, you can make changes to the look of the Mobile CRM by modifying the colors.

Once the changes are made then click on the “done” button and save the changes.

Password policies and initial configuration can be customized.

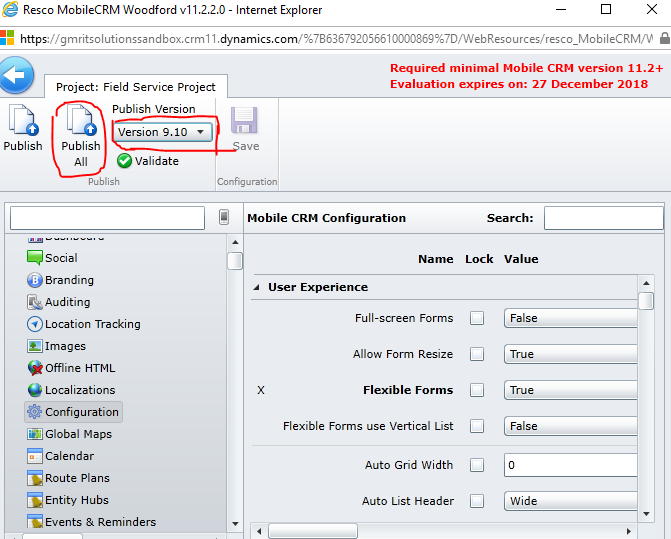
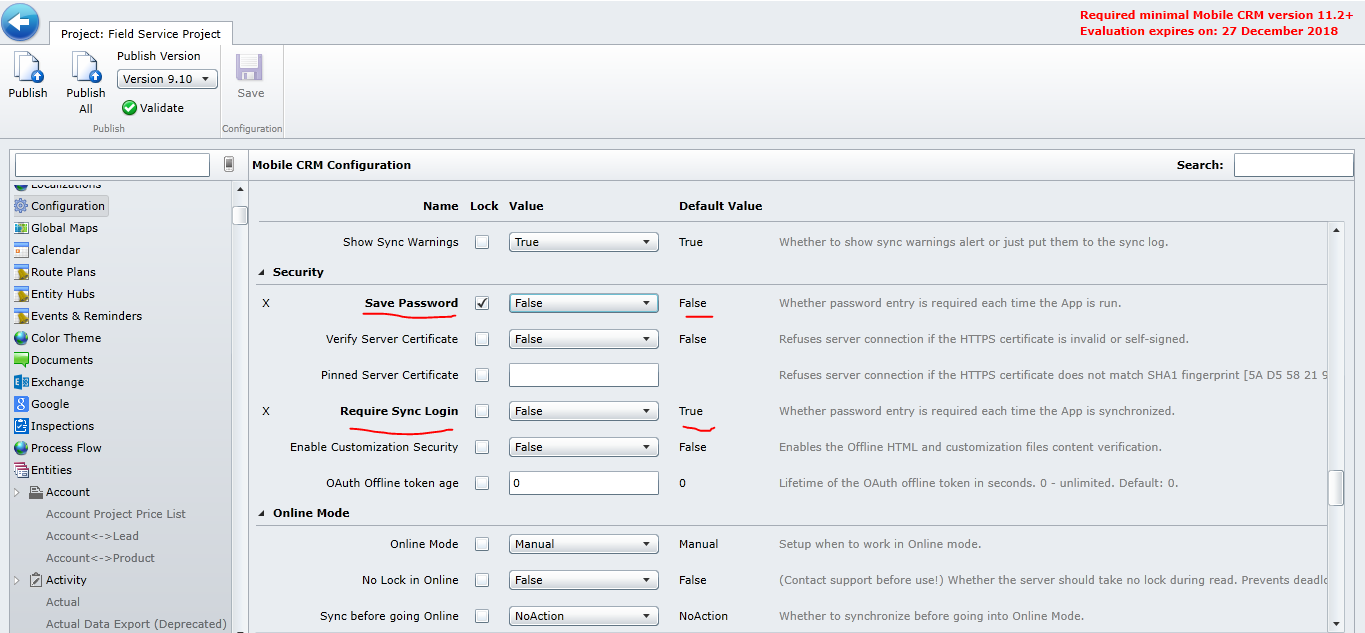
Configuration Settings in Resco MobileCRM

Open Mobile Project > Configuration
> Picture files
> Auto Sync
> Online Mode
> Auditing

The configuration area is a place to look  passwords are remembered at how often they synchronizing, these are things helps to control on what type of environment people see when they start working in the application.
Finally save the changes and publish all and ready to see all the changes on the Resco MobileCRM.
I hope this helps.
For Microsoft Dynamics 365 Consultancy/Training/Support/Licensing
Contact us: https://www.gmritsolutions.co.uk
Email: admin@gmritsolutions.co.uk
Share this: