Menu Close

Tag: #dynamics365

{How to} use code interpreter on customer uploaded files in agent conversations in copilot studio

Hello Everyone,

Today I am going to share my thoughts on the use of the code interpreter on customer-uploaded files in agent conversations in copilot studio.

Let’s get started.

Your chatbot (agent) can take a user upload during a chat and automatically analyze it using code, then return results within the same conversation.

What actually happens behind the scenes

1. User uploads a file

Examples:

Excel (.xlsx)
CSV (.csv)
Sometimes JSON or text files.

2. The agent receives the file

The file is passed into the conversation as:

System.Activity.Attachments

3. Code Interpreter kicks in

Copilot Studio:

Generate Python code automatically

Runs it in a secure environment

Uses it to:
Read the file
Analyse data
Create outputs

4. The agent responds with results

The bot sends back:

Charts
Tablets
Insights
Summaries

Example flow:

Real example
User says:
“Analyze this sales spreadsheet”

What the agent does:
Reads the Excel file
Groups sales by month
Calculates totals
Generates a chart
Response:
“Revenue increased 18% in Q3. Here’s a breakdown…” + chart

Why this feature is useful
No manual coding needed
Works in real-time conversations
Turns your agent into a data analyst
Great for:
Customer uploads
Business reports
Data exploration

In one sentence
It lets your Copilot Studio agent act like a Python-powered data analyst that can read and analyze files users upload during chat.

Important notes
Best with structured data (Excel, CSV)
Requires:
File upload enabled
Code Interpreter enabled
Has file size and type limits

That’s it for today.

I hope this helps.

Malla Reddy Gurram aka @UK365GUY

Share this:

{How to } Make Power Page Portal WCAG 2.1 Level A and AA Standards

Hello Everyone,

Today I am going to share my thoughts on how to make power pages portal according to the WCAG 2.1 Level A and AA Standards.

Let’s get started.

Making a Power Pages portal (from Microsoft’s Power Platform) compliant with WCAG 2.1 Level A and AA means addressing accessibility across design, content, and code. Power Pages gives you a solid starting point, but compliance depends on how you build and customise it.

Here’s a practical, structured way to get there:

1. Start with an Accessible Theme

Power Pages portals use templates (often based on Bootstrap).

Choose themes with good colour contrast

Avoid heavily customised UI that breaks semantic structure

Ensure responsive design (important for accessibility + zoom)

👉 Tip: Use tools like contrast checkers to meet 4.5:1 ratio (AA).

2. Use Proper HTML Semantics

WCAG relies heavily on structure.

Use correct heading hierarchy (h1 → h2 → h3)

Use semantic elements (

{How to} Use IVR with Omnichannel for customer service in Copilot Studio

Hello Everyone,

Today i am going to share my thoughts on using IVR with Omnichannel for Customer Service in Copilot Studio.

Let’s get started.

To use Interactive Voice Response (IVR) with Omnichannel for Customer Service in Microsoft Copilot Studio, you must integrate a voice-enabled agent into your Dynamics 365 environment. This allows the agent to handle phone calls, process keypad inputs, and escalate to live representatives when necessary.

Prerequisites:

Licensing: Ensure you have valid Copilot Studio and Dynamics 365 Customer Service licenses with the voice channel enabled.

Environment: Your agent and Dynamics 365 instance must be in the same geographical region.

Phone Number: Acquire a number through Azure Communication Services or use your own carrier (BYOC)

Setup Steps:

1. Configure the Agent in Copilot Studio:

1. Open your agent and navigate to Settings > Channels.

2. Select Dynamics 365 Customer Service (Under Customer Engagement Hub) and click connect.

3. Enabled Voice capabilities to allow speech recognition and DTMF (keypad) inputs.

2. Establish Handoff to Live Agents:

1. Go to Manage > Agent Transfers in Copilot Studio.

2. Select Omnichannel and enable it to ensure a seamless transition with full conversation history and variables.

3. Configure the Voice Workstream in Dynamics 365:

1. In the Customer Service Admin Centre, create a new voice workstream.

2. Link your acquired phone number to this channel.

3. Add your Copilot Agent to the workstream to act as the primary IVR.

Key IVR Capabilities:

DTMF Input: Customers can use their phone keypad for single- or multi-digit processing.

Speech Customisation: Use SSML (Speech Synthesis Markup Language) to adjust tone, pitch and speed.

Barge-in Control: Determine if customers can interrupt the agent while it is speaking.

Silence Detection: Configure the agent to handle pauses by triggering retries to reprompts.

That’s it for today.

I hope this helps.
Malla Reddy Gurram aka @UK365GUY

Share this:

{How to} Enhance IVR with generative answers optimized for voice in Copilot Studio

Hello Everyone,

Today I am going to share my thoughts on the Enhancing IVR with generative answers optimised for voice in Copilot Studio.

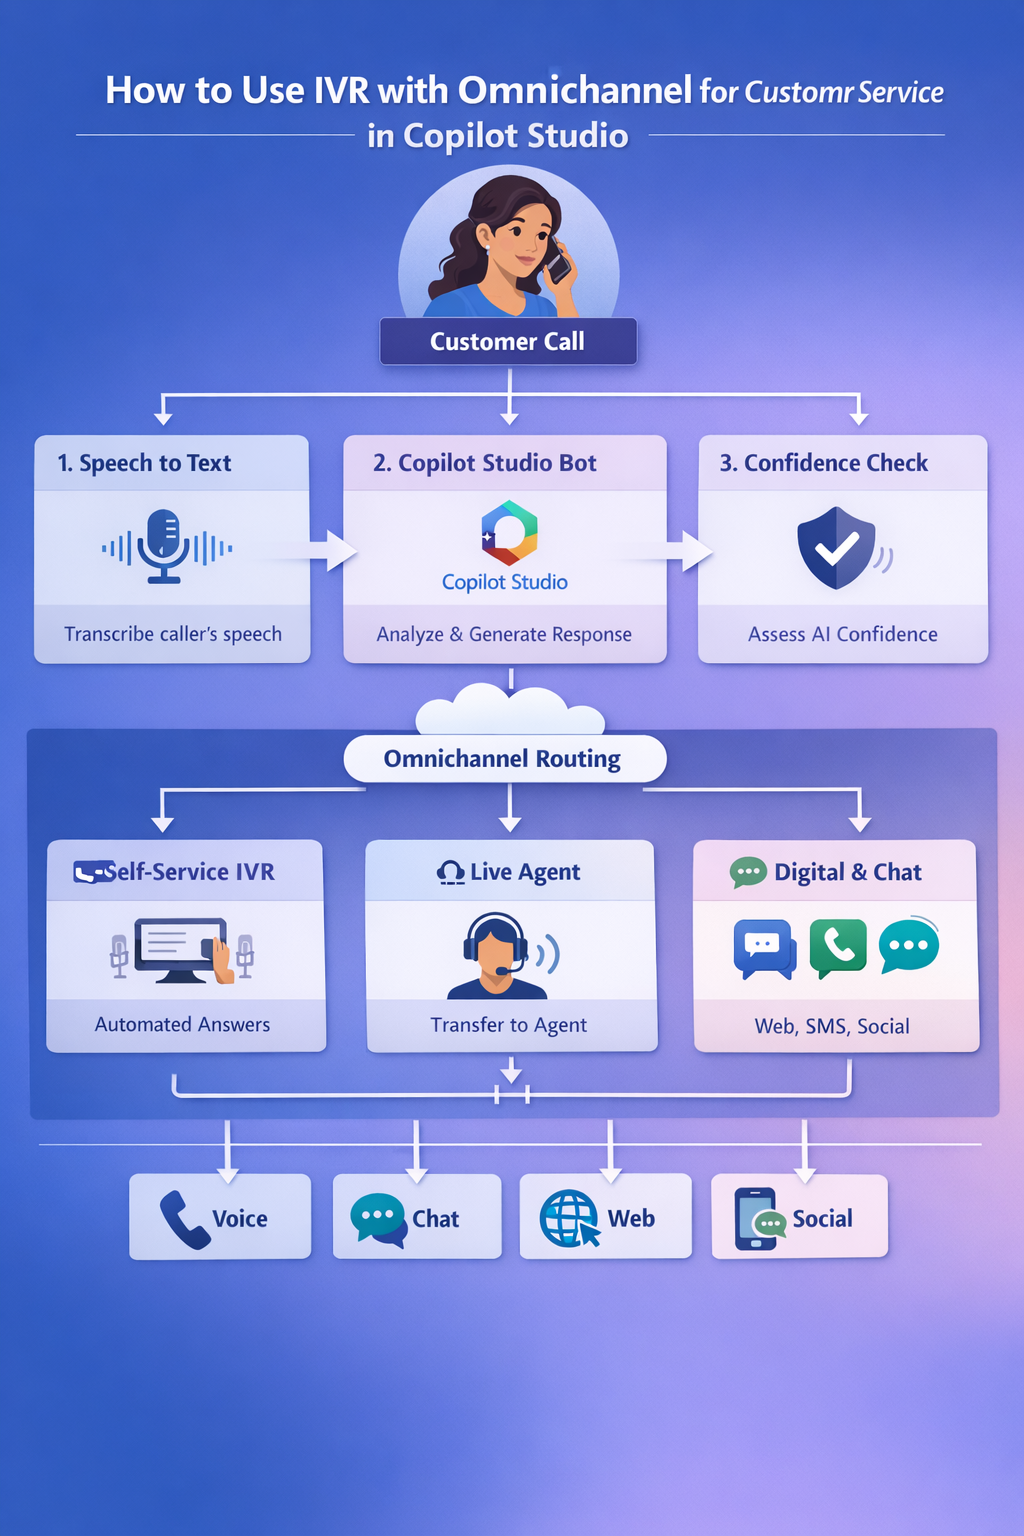
To enhance an IVR with generative answers optimised for voice in Microsoft Copilot Studio, you essentially combine LLM-based generative responses with voice-channel best practices so answers sound natural when spoken by a bot. Below is a practical step-by-step approach used in production IVR systems.

1. Enable Generative Answers in Copilot Studio

In Microsoft Copilot Studio you can allow the bot to generate responses from knowledge sources.

Steps
Open your Copilot Studio bot.

Go to Topics → Generative Answers.

Enable Generative AI responses.

Connect knowledge sources such as:

SharePoint

Public websites

Dataverse

Uploaded documents (PDF/Word)

This allows the bot to generate answers instead of only using scripted topics.

2. Configure Voice Channel (IVR)
To make the bot work as an IVR, connect it to voice channels via:

Azure Communication Services

Microsoft Teams

Dynamics 365 Customer Service

Third-party contact centers (Genesys, Avaya, etc.)

These platforms handle:

Speech-to-text

Text-to-speech

Call routing

3. Optimize Generative Answers for Voice

LLM responses are normally written for text, so you must shape them for spoken IVR.

Use Voice Response Instructions
In the Generative Answers configuration, add instructions like:

Respond in a short conversational style suitable for voice.
Use sentences under 15 words.
Avoid bullet lists and long explanations.
Pause between ideas.
If the answer is long, summarize first and offer to provide more details.
Example transformation:

Normal LLM output

Our return policy allows customers to return products within 30 days provided that the product is unused and in its original packaging.

Voice-optimized

You can return items within 30 days.
The product must be unused and in the original packaging.

4. Add Fallback Logic for IVR

In IVR flows you should always handle uncertain AI answers.

Typical pattern:

User question

Generative Answer

Confidence check

If low confidence → transfer to agent

Use Power Automate actions or topic conditions to:

escalate calls
ask clarification questions
repeat simplified answers

5. Limit Response Length
IVR responses must be shorter than chat responses.

Recommended limits:

Type Length
Primary answer 1–2 sentences
Follow-up details Optional
Total speaking time < 15 seconds 6. Add Confirmation Prompts Voice bots should confirm understanding. Example: “Your order was shipped yesterday. Would you like the tracking number?” This improves call flow and reduces frustration. 7. Improve Voice Naturalness (SSML) Use Speech Synthesis Markup Language (SSML) with Azure TTS. Example:

Your order shipped yesterday.

Would you like the tracking number?

This works with:

Azure AI Speech

8. Monitor and Retrain

Track voice interactions using analytics in:

Copilot Studio analytics

Dynamics contact center insights

Improve by:

Adding missing knowledge

Shortening responses

Adjusting prompt instructions

Example: IVR Flow with Generative Answers

Caller question

Speech to text

Copilot Studio

Generative Answer

Voice optimized response

Text to speech

Caller hears response

That’s it for today.

I hope this helps.

Malla Reddy Gurram aka @uk365guy

Share this:

{Do you know} Use workflows on Calendar events in Teams and Outlook.

Hello Everyone,

Today I am going to share my thoughts on use workflows on calendar events in Teams and Outlook.

Let’s get’s started.

Certainly! You can use workflows on calendar events in Microsoft Teams and Outlook to automate repetitive tasks and processes. This feature which is part of the Microsoft Power Automate platform, allows you to create flows that can be triggered at the start or end of a meeting.

For example:

Here’s how you can set up and use the workflows:

1. Select Apps from the left side of the Teams.

2. Scroll and select Workflows from the navigation on the left.

3. Choose a workflow that fits your needs.

4. Follow the prompts to set it up.

Once added, the workflow will run automatically based on the triggers you’ve configured. For instance, you could have a workflow that notifies a channel when a Planner task changes status or starts an approval process when a SharePoint list is modified.

This functionality is expected to be generally available in August 2024. It is designed to boost productivity by automating tasks related to calendar events, saving you time and effort.

That’s it for today.

I hope this helps.

Malla Reddy Gurram(@UK365GUY)
#365blogpostsin365days

Share this: